Welcome to the second in a series of blog posts detailing how to integrate .NET 6.0 C# scripting support into a C++ Windows game engine. If you haven’t already, do read the first part which provides an introduction to what we will be doing as part of this series.
Edit (9 Oct 2022): Added an extra paragraph in the ManagedScripts set up instructions to add a project reference.
Now without further ado, let’s begin.
Dependencies
To begin hosting .NET in our C++ application, we need to first make sure we have the required dependencies installed. For this tutorial, we will be using Microsoft Visual Studio 2022 and we will need the following workloads:
- .NET desktop development
- Desktop development with C++
- C++/CLI support for v143 build tools (Latest)
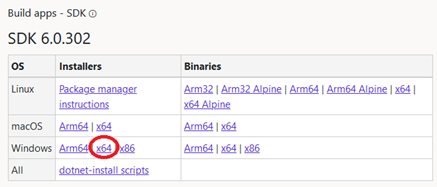
We will also need to install the latest release of the .NET SDK from https://dotnet.microsoft.com/en-us/download/dotnet/6.0. Make sure to select the correct installation option. You are looking for the x64 Windows Installer.
Setting Up the Visual Studio Solution
We will need to set up 4 projects in the Visual Studio Solution. The diagram below shows the relationship between each of them.

$(SolutionDir).bin\$(Configuration)-$(Platform). As a C++/CLI requirement, the Runtime Library for all C++ projects must be set to use the
/MD (Release) and /MDd (Debug) settings. This is the default setting in Visual Studio so we won’t need to make any changes. Just do take note that this affects the types of binaries for third party libraries that you may use.C++ Project (DLL): Core
In order to allow our C# code to execute C++ code, we will need to package our C++ code into a Dynamic Link Library (DLL). This will allow us to call the C++ functions embedded in the DLL from C++/CLI and subsequently from C#.
Setting Up External Dependencies
Ensure that you place the dependencies in a directory you are comfortable with and reference them accordingly in the Visual Studio project settings. For our case, we will be placing them in a “extern” folder in the solution directory.
CoreClrHost.h
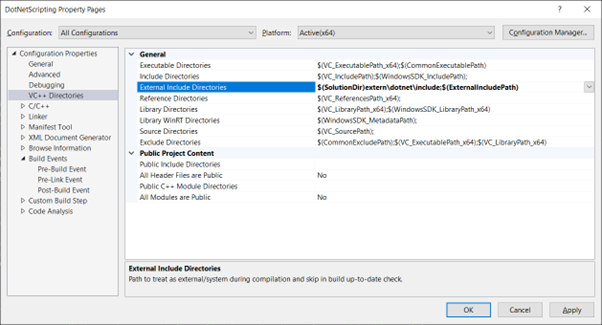
We need this header for hosting the .NET CLR in your native application. The header file can be retrieved from: https://github.com/dotnet/coreclr/blob/master/src/coreclr/hosts/inc/coreclrhost.h. Place this file in the extern/dotnet/include folder.
We also need to add it as an external include.
.NET DLLs
These are the DLLs required for the .NET library and for hosting the .NET CLR in your native application. The DLLs can be retrieved from https://dotnet.microsoft.com/en-us/download/dotnet/6.0.
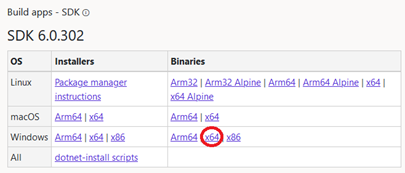
Once downloaded, you can retrieve the DLLs from the shared\Microsoft.NETCore.App\X.X.X directory. Place these DLLs in the extern/dotnet/bin folder.
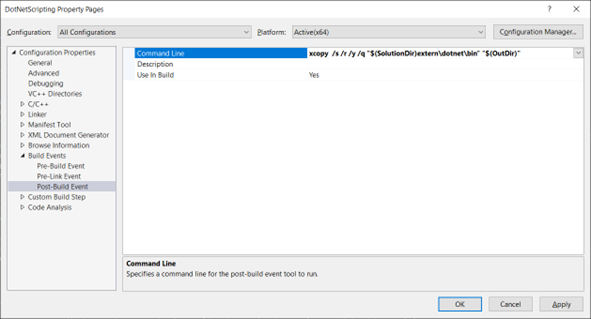
We will also need to add a post-build event that copies these DLLs into the output directory. A simple command like this will do:xcopy /s /r /y /q "$(SolutionDir)extern\dotnet\bin" "$(OutDir)"
Setting Up a Base Abstraction
For now, we will not be adding in any of the .NET code. We will do that in the next part. Instead, we will build out a simple Application class which loops that we can put our future code into.
You can follow the below code. Keep in mind that we have a DLL_API annotation to export the Application class for use by consumers of the DLL. In a real application, you would have to export all objects and functions that you wish to be used in your C# scripts too. To do this, we create a new header file called ImportExport.h and insert the following code:
// ImportExport.h
#pragma once
#ifndef DLL_API
#   if defined DLL_API_EXPORT
#       define DLL_API __declspec(dllexport)
#   else
#       define DLL_API __declspec(dllimport)
#   endif
#endif
We will also need to add the DLL_API_EXPORT pre-processor definition in the project properties:
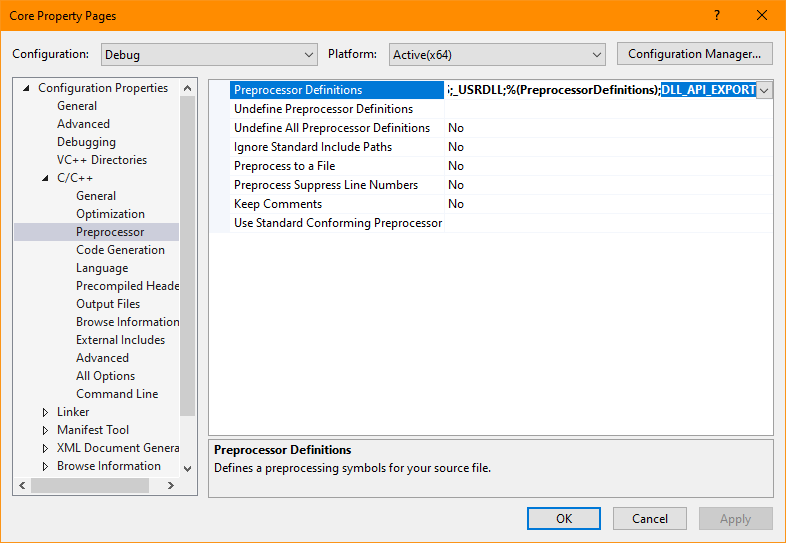
As for the Application class, it’s just a simple infinite loop in a Run() function that checks if the escape button is pressed:
// Application.h
#pragma once

#include "ImportExport.h"

namespace Core
{
    class DLL_API Application
    {
      public:
        void Run();
    };
}
// Application.cpp
#include "Application.h"
#include <Windows.h>

namespace Core
{
    void Application::Run()
    {
        while (true)
        {
            if (GetKeyState(VK_ESCAPE) & 0x8000)
                break;
        }
    }
}
C++/CLI Project (CLR DLL): ScriptAPI
Next up, we need a C++/CLI project. This is probably new to many people as it is not a commonly used language. C++/CLI is a dialect of C++ that allows us to write C++ code that interfaces with managed code and hence, .NET objects.
To do so, you’ll want to create a “CLR Empty Project (.NET)” in Visual Studio. Take note to not accidentally select the “CLR Empty Project (.NET Framework)” project as that is for the older .NET Framework. Unlike the other C++ projects, we will be setting the language version of this project to C++17. This is because currently C++/CLI only supports up to C++17.* As of 16 March 2023, C++/CLI now supports C++20 in Visual Studio 2022. However, for the purposes of this tutorial, we will maintain the existing requirements. Once the full tutorial series is completed, I will revisit this and update the whole tutorial with support for .NET 7.0 and C++20 in C++/CLI.
Since this project will interface with the Core project’s C++ code, we need it to link with the Core project’s lib file:

This lib file will be generated in the output directory so we will need to tell Visual Studio to search the output directory $(OutDir) for this lib:

For now, we will not have any code in it but will add more in the following parts so do delete any automatically generated source files in this project if there are any.
* Thankfully, the MSVC compiler is binary compatible since Visual Studio 2015 so this only means that this project will not be able to properly parse any header files from the Core project that utilizes the C++20 language and library features. If you would like to be consistent and enforce C++17 across all projects, that is fine as well.
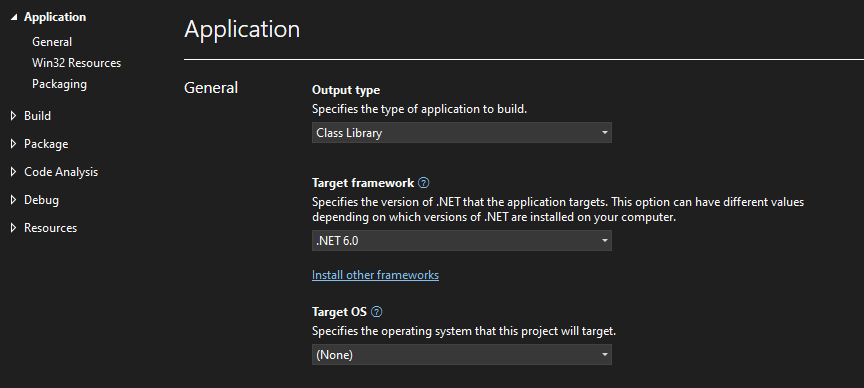
C# Project (Class Library DLL): ManagedScripts
Finally, we will need to create the C# Class Library that will contain all of the C# scripts that we plan to attach to our game entities. For now, we will leave that as part of the entire solution, however, in a future blog post, we will learn how to extract this project so that you can build it separately from the engine solution, thus allowing for hot reloading.
Do remember to make sure to configure this project as a class library and to also set the build dependency of this project to the Core and ScriptAPI projects.
We will also need to add a reference to the ScriptAPI project so that our C# code will be able to interface with functions and classes we will write in the ScriptAPI project. You can do this by right clicking the “ManagedScripts” project in the solution explorer and select “Add > Project Reference…”.

As before, we will be leaving this project empty for now so do delete any automatically generated source files in this project too.
Setting Output Directory
For C# projects, setting up the project to output to the same directory is going to be a bit more challenging as we will need to modify the csproj file directly.
Open the csproj file using a text editor like Notepad++ or Visual Studio Code and add the following between the Project tags:
  <PropertyGroup Condition="'$(Configuration)|$(Platform)'=='Debug|x64'">
    <OutputPath>$(SolutionDir).bin\$(Configuration)-$(Platform)\</OutputPath>
    <PlatformTarget>x64</PlatformTarget>
  </PropertyGroup>
  <PropertyGroup Condition="'$(Configuration)|$(Platform)'=='Release|x64'">
    <OutputPath>$(SolutionDir).bin\$(Configuration)-$(Platform)\</OutputPath>
    <PlatformTarget>x64</PlatformTarget>
  </PropertyGroup>
Do note that in the project’s properties panel, this will not be reflected correctly. However, the compiler will correctly build the output into the folders we have specified here.
C++ Project (Exe): Executable
This will be the project that consumes the Core DLL to run the application. This can be a simple project with a single CPP file containing a main function that executes the functions from the Core DLL to start the application. In our case, we will be using the Run() function we wrote earlier.
We will also need to set the project’s build dependencies to all previous three projects.

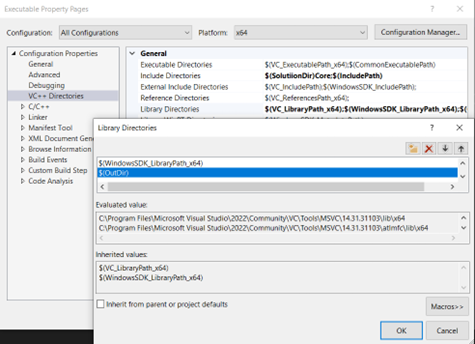
Link with Core
To link with the Core project’s DLL, we need to link with the Core project’s LIB file. Since all our output files are built to the same place, we can simply add $(OutDir) as one of the “Library Directories”.
We also need to provide access to the header files so we’re going to add $(SolutionDir)Core as one of the “Include Directories”.
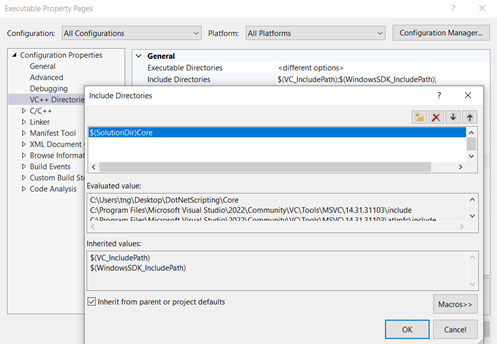
One last thing, we need to provide access to “CoreClrHost.h” since that is included in DotNetRuntime.h.

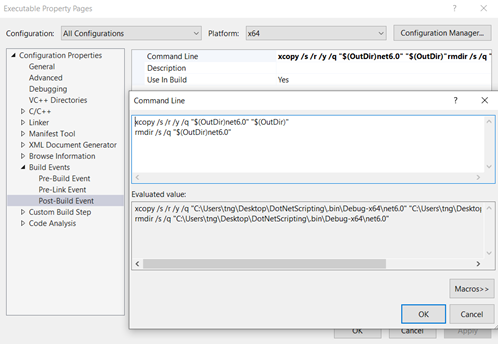
Copy Additional Dependencies
With .NET 6.0, the ManagedLibrary’s output was built into a “net6.0” folder so we need to add an additional Post-Build command to copy it out and then delete the original.
xcopy /s /r /y /q "$(OutDir)net6.0" "$(OutDir)"
rmdir /s /q "$(OutDir)net6.0"
Implement main()
Now all we need to do is just fill up the main function to execute the Application::Run() we wrote earlier.
#include "Application.h"

int main()
{
    Core::Application app;
    app.Run();

    return 0;
}
Wrapping Up
With our project set up out of the way, we can get started with hosting the .NET runtime. In the next post, we’ll do exactly that and get to see C# code running in our C++ application.
A repository of a working solution based on this tutorial can be found here.


0 Comments